Create Your Own TyranoBuilder Plugins
Support for plugins was added to TyranoBuilder from v182. TyranoBuilder plugins add new functionality to the TyranoBuilder engine, usually by adding new components for use in the Scene Editor. You can download plugins from the official TyranoPlugin Library or other trusted sources, or you can make your own plugins using TyranoScript.
In this tutorial, we’ll walk through the steps to get started create a simple TyranoBuilder plugin and load it into TyranoBuilder. The basic steps are:
① Create a TyranoScript plugin
② Adapt the plugin to work with TyranoBuilder
Let’s get to it!
① Create a TyranoScript Plugin
So we’ll start by making a plugin that works with TyranoScript. In this case, our plugin functionality will be to hide the message window and change the background.
Here’s how we would write this in TyranoScript:
; Hide the message window
[layopt layer = message 0 visible = false]

;Change the background
[bg storage = "room.jpg" time = 2000] ;

;Wait while the background changes
[wait time = 300] ;

;Unhide the message window and resume the game
[layopt layer = message 0 visible = true]
We could use this script in our game as-is by copying and pasting it every time we change the background, but that would be time-consuming and a bloat our game code. We can achieve this much more efficiently by creating a macro from the script, then we can call it anytime using just a single tag.
Here is the same script turned into a macro:
[macro name = "bg_no_message"]
; Hide the message window
[layopt layer = message 0 visible = false]
;Change the background
[bg storage=%storage time=%time]
; Wait while the background changes
[wait time=%wait_time]
; Unhide the message window and resume the game
[layopt layer = message 0 visible = true]
[endmacro]
Now we can run the script using just one line, passing the background file and wait time to the macro as parameters, like this:
[bg_no_message storage = "room.jpg" time = 2000 wait_time = 5000]
Then all we need to do is turn this macro into a TyranoScript plugin. In this case, we’ll call our plugin ‘bg_no_message‘.
Navigate to the project folder and create a folder named data/others/plugin/bg_no_message.
In that folder, create a file called init.ks and paste in the above macro. init.ks is executed whenever plugins are called, so our macro will be available to use. We can then run the plugin from TyranoScript:
; Call the plugin
[plugin name = "bg_no_message"]
; Now you can use the macro
[bg_no_message storage = "room.jpg" time = 2000 wait_time = 5000]
So there we have our TyranoScript plugin which makes the macro available when we call it. In the next step, we’ll adapt this plugin for use with TyranoBuilder.
② Adapt the plugin to Work with TyranoBuilder
TyranoBuilder plugins use the file extension .tbp (for ‘tyrano builder plugin’), so the end result of this step will be a plugin file named ‘bg_no_message.tbp’.
Editing an existing file is easier and faster than writing from scratch, so we’ll use a configuration template for TyranoBuilder plugins to create our plugin.
Download the file plugin_template.builder.js.
Now, move plugin_template.builder.js into the plugin folder that we used earlier (the same folder as init.ks), and edit the filename to match the name of our plugin. In this case, ‘bg_no_message.builder.js’.
Next, open bg_no_message.builder.js with an editor, and we’ll update the contents to run our plugin.
First, let’s rewrite the basic information for the plugin.
■ Line 15: Change to the name of the plugin
Original: this.name = TB.$.s (“Plugin Template”);
Edit to: this.name = TB.$.s (“Change Background No Msg”);
■ Line 18: Set a description for the plugin
Original: this.plugin_text = TB.$.s (“Plugin template. Use this file as reference to create TyranoBuilder plugins”);
Edit to: this.plugin_text = TB.$.s (“Hide the message window and change the background”);
There are similar descriptions in lines 69 and 70, so go ahead and change those too.
■ Line 64: Set the tag name you would like to use for the plugin. If you would like to use multiple tags, define multiple associations for cmp.
Original: cmp [“sample_component_ 1”] = {
Edit to: cmp [“bg_no_message”] = {
■ Line 79: Component name
Original: TB.$.s (“Background Change (Sample)”), = {
Edit to: TB.$.s (“Change Background No Msg”)
■ Line 80: Component type
Original: component_type: “Image”,
Edit to: component_type: “Image”,
The component type determines if or how the component for our plugin is previewed in the Scene Editor. In this case, the component affects the background, so we’ll show the background image in the Scene Editor.
The following component types can be used:
component_type: “Image”

component_type: “Simple”

component_type: “Sound”

component_type: “Text”

component_type: “Movie”

■ From line 99: Define the plugin parameters
Set only the parameters that are required for your particular plugin.
In this case, we’re using three parameters: storage (the background image), time (the duration for the background change), wait_time (the time to wait after background changes.)
So the script for our parameters will look like this:
param:{
/* Define the parameters. 'storage' represents the parameter name. */
/* Image selection example */
"storage" :
{ type : "ImageSelect", /* The parameter type. In this case, an image selection. */
file_path : "bgimage/", /* The background image folder is set as default */
base_img_url : "data/bgimage/", /* Set the target selection folder */
name : TB.$.s("background image"), /* Parameter name */
help : TB.$.s("Change the background image."), /* Parameter explanation.
Displayed in the help bar at the bottom of the screen. */
vital : true, /* Sets optional or not. Recommended to be left as is. */
default_val : "", /* Set the default value of the component */
line_preview: "on", /* Set whether or not to preview in the Scene Editor */
validate : {
required : true
}
},
/* Numerical input examples */
"time" : {
type : "Num", /* Set input type to number */
name : "Time", /* Parameter name */
unit : "ms", /* Units */
help : TB.$.s("The background will change over the specified duration."),
default_val : 1000, /* Default value */
/* spinner expresses the number in spinner format */
spinner : {
min : 0, /* Minimum input value *
/ max : 10000, /* Maximum Input Value */
step : 500 /* The step value for one spin */
},
validate : {
number : true /* Check if the input is a valid number */
}
},
"wait_time" : {
type : "Num", /* Set input type to number */
name : "Wait Time", /* Parameter name */
unit : "ms", /* Units */
help : TB.$.s("Set the time to wait after the background has changed."),
default_val : 1000, /* Default value */
/* spinner expresses the number in spinner format */
spinner : { min : 0, /* Minimum input value */
max : 10000, /* Maximum Input Value */ step : 500 /* The step value for one spin */
},
validate : {
number : true /* Check if the input is a valid number */
}
},
},
After editing, save bg_no_message.builder.js and now we’ll now convert it into the TyranoBuilder plugin format.
You should have the below two files in the TyranoScript plugin folder:

Create a .zip file of the folder ‘/bg_no_message’, and change the file name extension from .zip to. tbp.
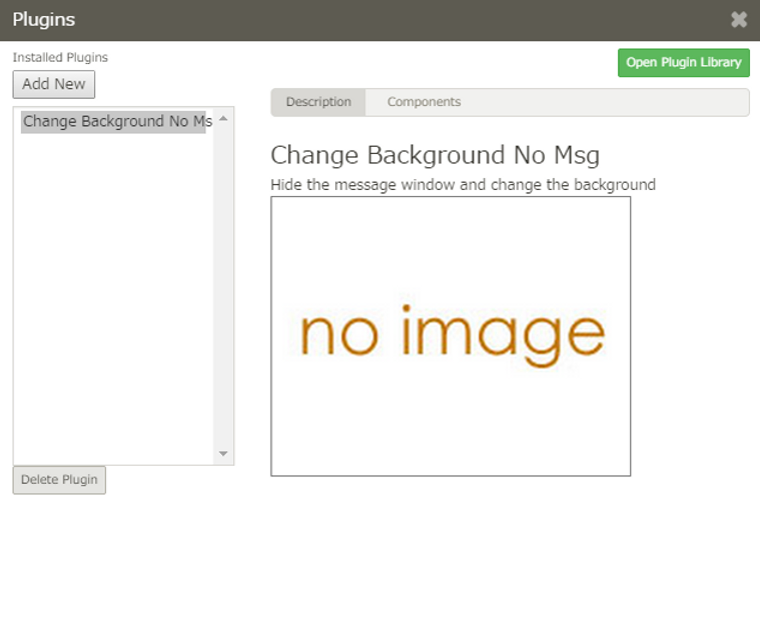
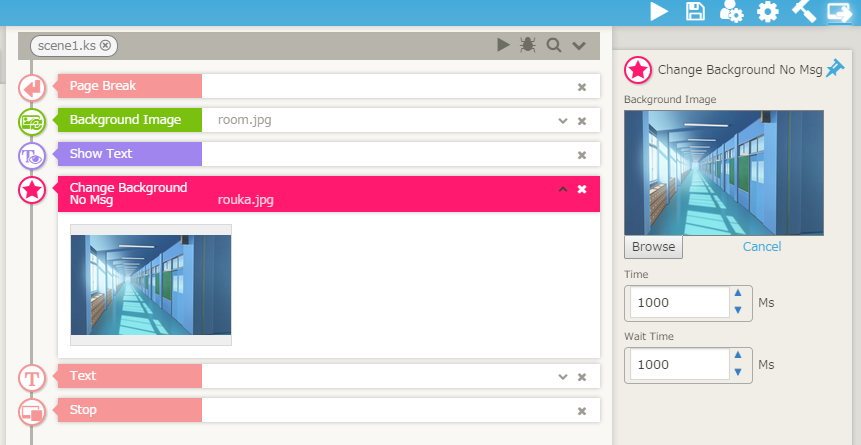
That’s it! Let’s see how it works. Launch TyranoBuilder and load the .tbp file.

You should now have a nice, new, easy-to-use component in TyranoBuilder, and you can distribute the plugin (.tbp file ) for others to use.

For reference, here you can download a ready-made template for this tutorial from here.
Submit YOUR Plugins to the Official Plugins Website!
If you have a nice plug-in that you’d like to share with the world, feel free to contact the TyranoBuilder developer about having it included in the official TyranoPlugin Library!
Contact the developer by email ([email protected]) or via Twitter (@shikemokumk).
More about Plugins
① Play with the Plugin Template!
The template file that we used in this tutorial contains pretty much every type of parameter with accompanying comments, so you can use it to create plugins with a wide variety of functionalities.
Download the TyranoBuilder Plugin Template.
② Reference Contents of Official Plugins
Feel free to open up and learn from the official plugins available at the TyranoPlugins library.
Just change the extension of a .tbp to .zip and decompress it to see its contents.
③ About the TyranoBuilder Interface
The file builder.js includes interface objects that control the functionality of TyranoBuilder itself.
You can access and customize various TyranoBuilder functions by using the object this.TB.
We’ll follow up with more detailed information about this in a future tutorial, but you can get the gist of how it works by checking out the contents of official plugins.
